
Equipment
- starlink kit: dish, router, cable, power supply
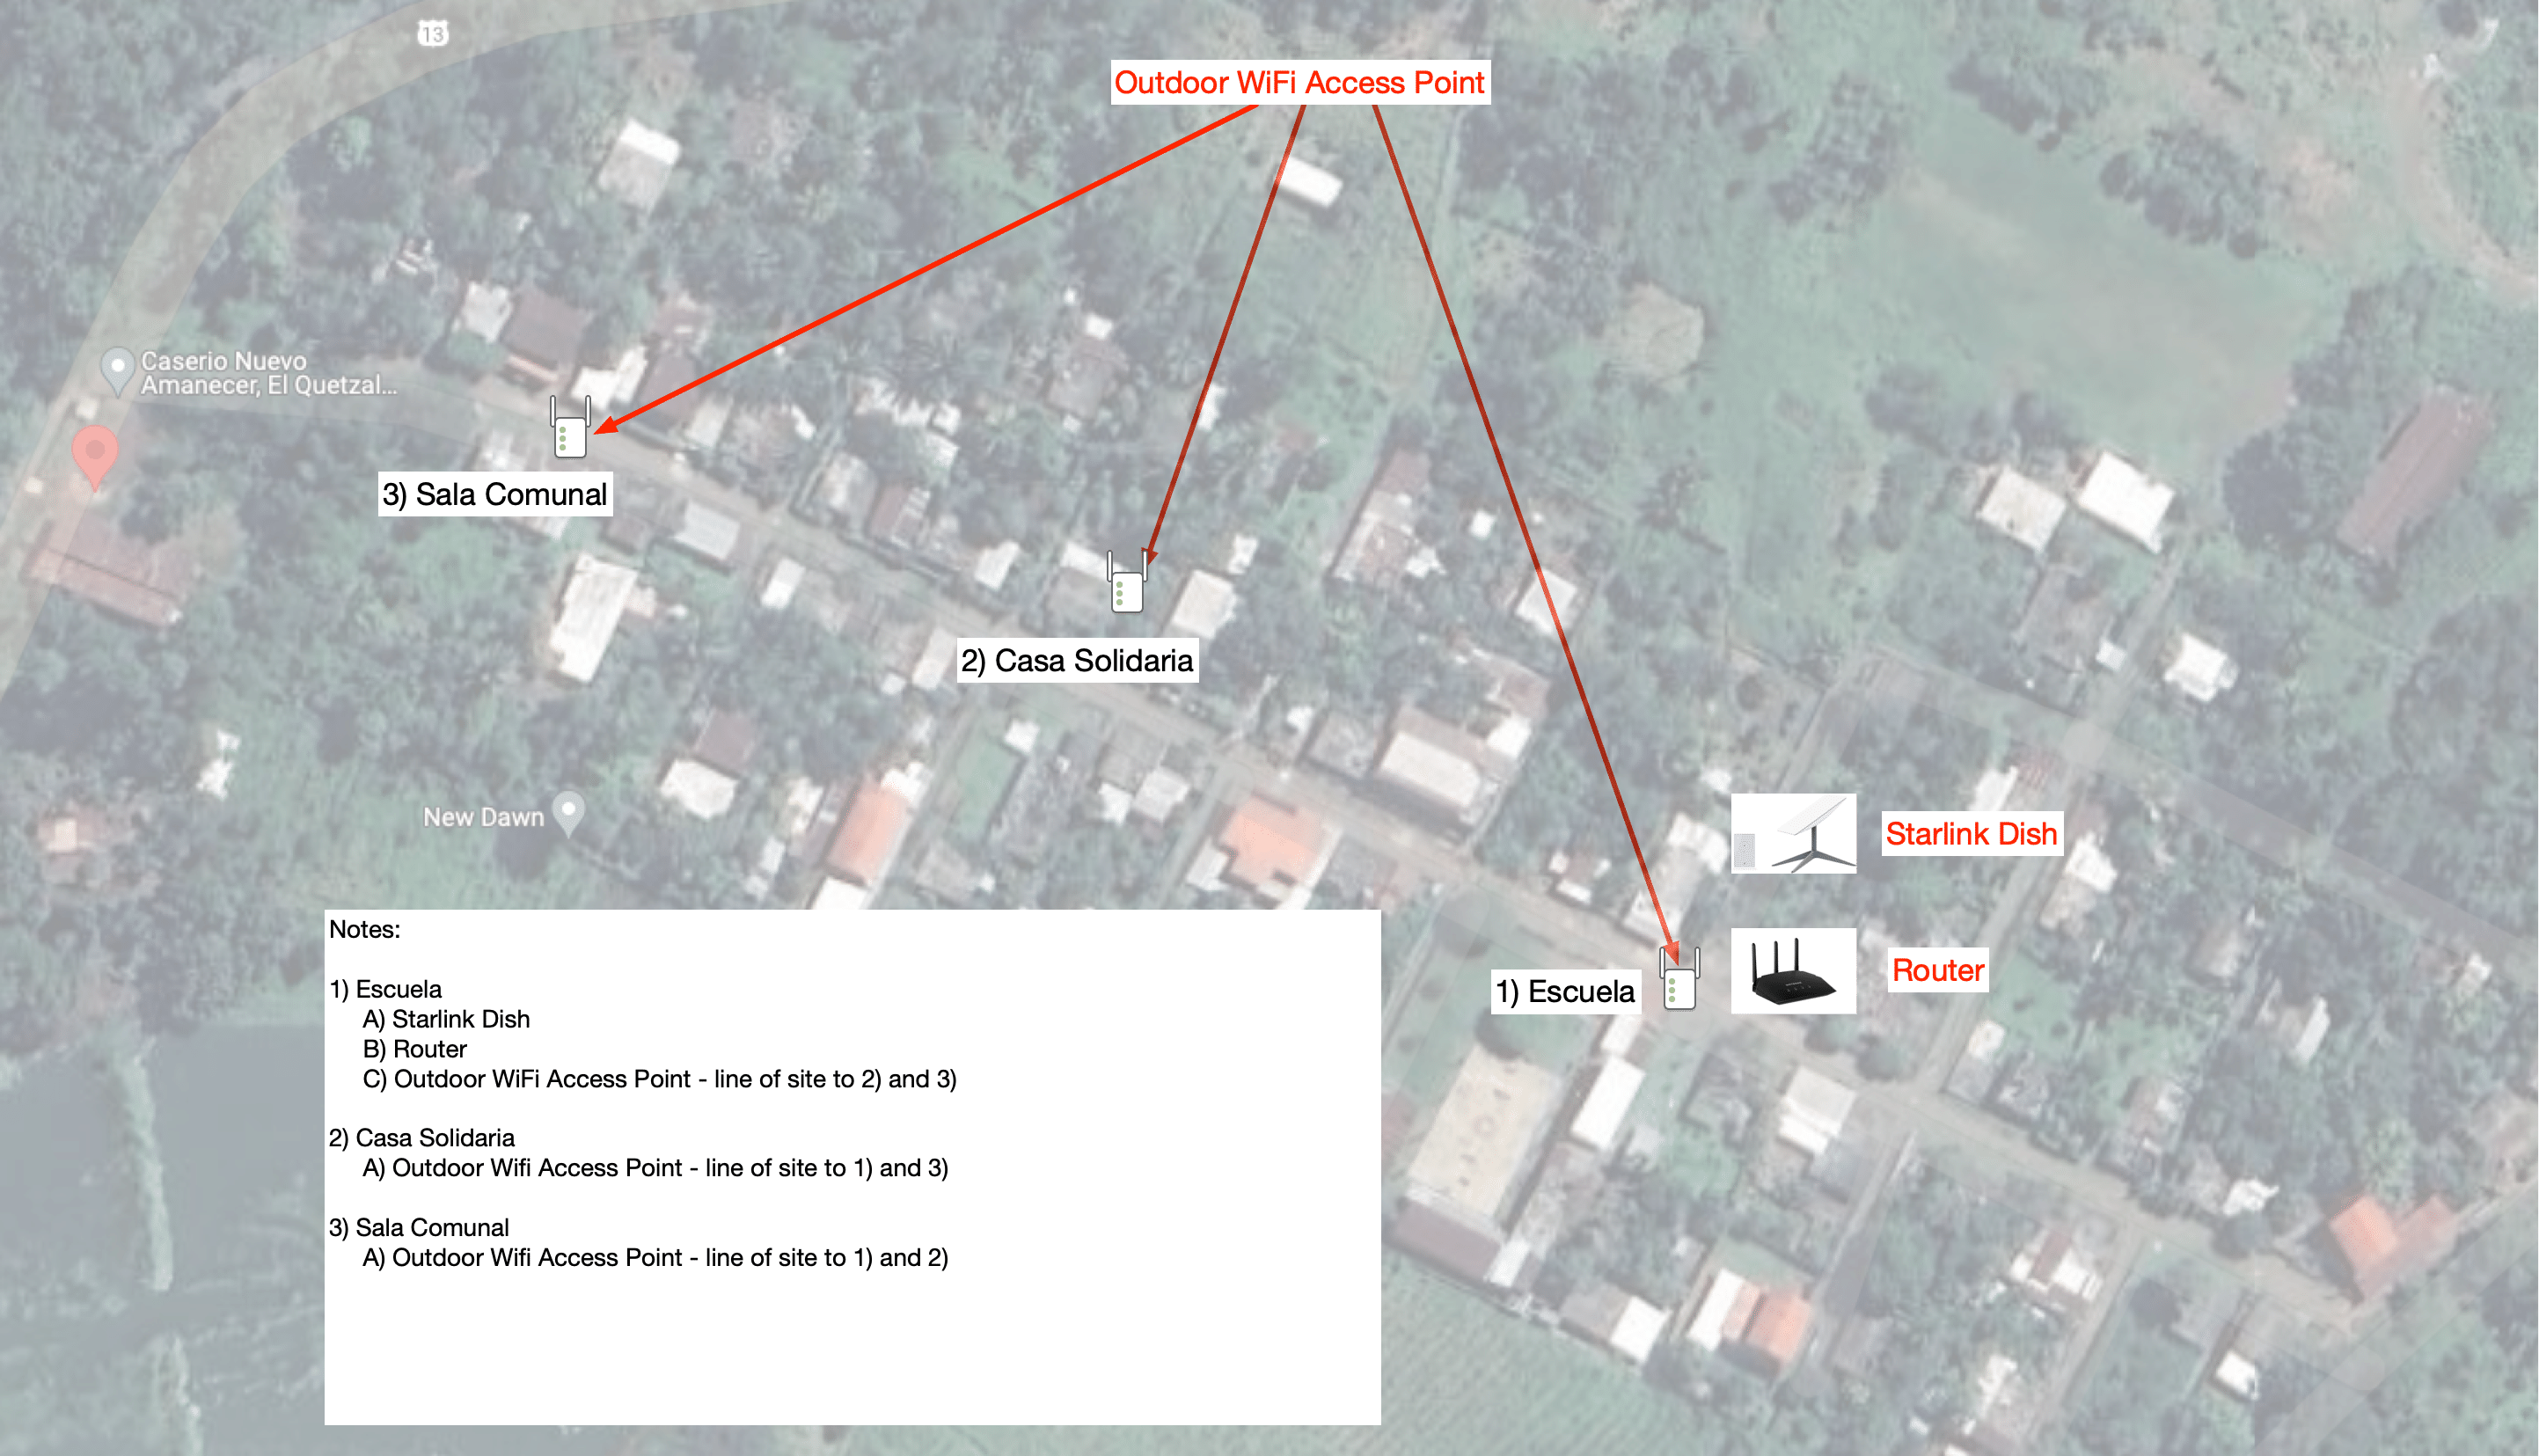
- non-starlink router
- primary outdoor access point antenna
- secondary outdoor access point antennas (3 - planning for 1 spare)
- ethernet adapter for Starlink router (pass through Starlink router to router above)
- ethernet cable crimper; ethernet cable cutter; ethernet connection tester
Starlink Setup
- Locate least obstructed view of satellites by using Starlink mobile app.
- Secure dish.
- Connect to power.
Pass through router set up and connectivity
- Connect ethernet adapter to Starlink router. (For Dry Run use another sourced live ethernet connection in place of Starlink dish)
- Connect downstream end of ethernet cable to Motorola router WAN port.
- Enable Bypass mode on the Starlink app. To do this, connect to the Starlink WiFi, launch your Starlink app, go to Settings > WIFI CONFIGURATION > ADVANCED > Bypass Starlink WiFi router, toggle the switch to enable, and then tap SAVE > OK
- Verify router connectivity.
Update firmware on antennas
To update firmware you first need to download the firmware update specific to the access points.
- Start at https://tp-link.com
- Open door to antenna and look for barcode. Identify hardware version by looking at text on top of barcode at the right for Hardware Version (you will use that in the next step)
- Navigate to Home>Network Expansion>Access points. From there hit the magnifying glass and look for (in separate searches): EAP650-Outdoor and EAP225-Outdoor
- Select the Hardware Version you found earlier. in Step 2.
- Next go to System and Select Download. Decompress the downloaded file.
Repeat these steps for all 4 access points:
- Two ethernet cables are necessary for each of the ports on the POE power supply. One cable goes from a router LAN port to the LAN port on the POE power support. The other cable goes from the POE port on the POE power supply to the antenna access point hardware. Plug in the power supply and look for a green light on the access point.
- On the laptop connect to wifi access point associated with the antenna access point. You may need to select this from Other and it will have a long name something like this TP-Link_2.4GHz/5GHz_XXXXXX.
- Find out url to connect to by using this command in the terminal: nslookup [tplinkeap.net](http://tplinkeap.net/)
- Use the Address under Non-authoritative answer and open a browser with this Address in the url. Example: http://192.186.1.130, but your address likely will be different.
- When site opens, use admin/admin to login first time. You will be asked for new username and password, follow instructions.
- From there follow Step 5 from https://www.tp-link.com/us/support/faq/2165/.
Software install of Omada Controller
Clone repo https://github.com/mbentley/docker-omada-controller
cd docker-omada-controller
Build docker-omada-controller - for Apple silicon see different build command in repo docs
docker build \
--build-arg INSTALL_VER="5.13.23" \
--build-arg ARCH="amd64" \
-f Dockerfile.v5.x \
-t mbentley/omada-controller:5.13 .
Run docker-omada-controller. Attempted docker-compose method without success. Instead use docker run command:
docker run -d \
--name omada-controller \
--restart unless-stopped \
--ulimit nofile=4096:8192 \
-p 8088:8088 \
-p 8043:8043 \
-p 8843:8843 \
-p 27001:27001/udp \
-p 29810:29810/udp \
-p 29811-29816:29811-29816 \
-e MANAGE_HTTP_PORT=8088 \
-e MANAGE_HTTPS_PORT=8043 \
-e PGID="508" \
-e PORTAL_HTTP_PORT=8088 \
-e PORTAL_HTTPS_PORT=8843 \
-e PORT_ADOPT_V1=29812 \
-e PORT_APP_DISCOVERY=27001 \
-e PORT_DISCOVERY=29810 \
-e PORT_MANAGER_V1=29811 \
-e PORT_MANAGER_V2=29814 \
-e PORT_TRANSFER_V2=29815 \
-e PORT_RTTY=29816 \
-e PORT_UPGRADE_V1=29813 \
-e PUID="508" \
-e SHOW_SERVER_LOGS=true \
-e SHOW_MONGODB_LOGS=false \
-e SSL_CERT_NAME="tls.crt" \
-e SSL_KEY_NAME="tls.key" \
-e TZ=Etc/UTC \
-v omada-data:/opt/tplink/EAPController/data \
-v omada-logs:/opt/tplink/EAPController/logs \
mbentley/omada-controller:5.13
Go to http://localhost:8088
Use tp-link account for login.
Add router under Wifi section
Add first access point (EAP650-Outdoor) connected to router LAN port. Two ethernet cables are necessary for each of the ports on the POE power supply for the first (EAP650-Outdoor) access point. One cable goes from a router LAN port to the LAN port on the POE power support. The other cable goes from the POE port on the POE power supply to the antenna access point hardware. Plug in the power supply and look for a green light on the access point.
Similar steps for next two access points (EAP225-Outdoor). One ethernet cable needed: going from the POE port on the POE power supply to the antenna access point hardware. Plug in the power supply and look for a green light on the access point.
.svg)